
Gas piston installation: key takeaways
Gas piston installation can make a heavy Murphy bed easier to raise and lower, but the pistons are best planned into the design rather than added after the bed is built. Justin of Justin Built says the bed was manageable for him but difficult for other people in his household. After adding pistons, he found that opening and closing took less effort.
In the demonstration, the pistons helped the bed stay in position. Justin still used the safety pins, though, and warned that the bed becomes heavy near its lower end. His experience is useful as a project example, not proof that the same hardware or mounting arrangement will suit every Murphy bed.
This article separates Justin’s observations from general planning and safety guidance. Before starting gas piston installation, check the bed hardware instructions, identify suitable spring force and mounting geometry, and plan how you’ll support the bed during work. The practical lesson from the video is simple: include the pistons in the design early. Treat gas piston installation as part of the bed’s mechanism, not a last-minute add-on.
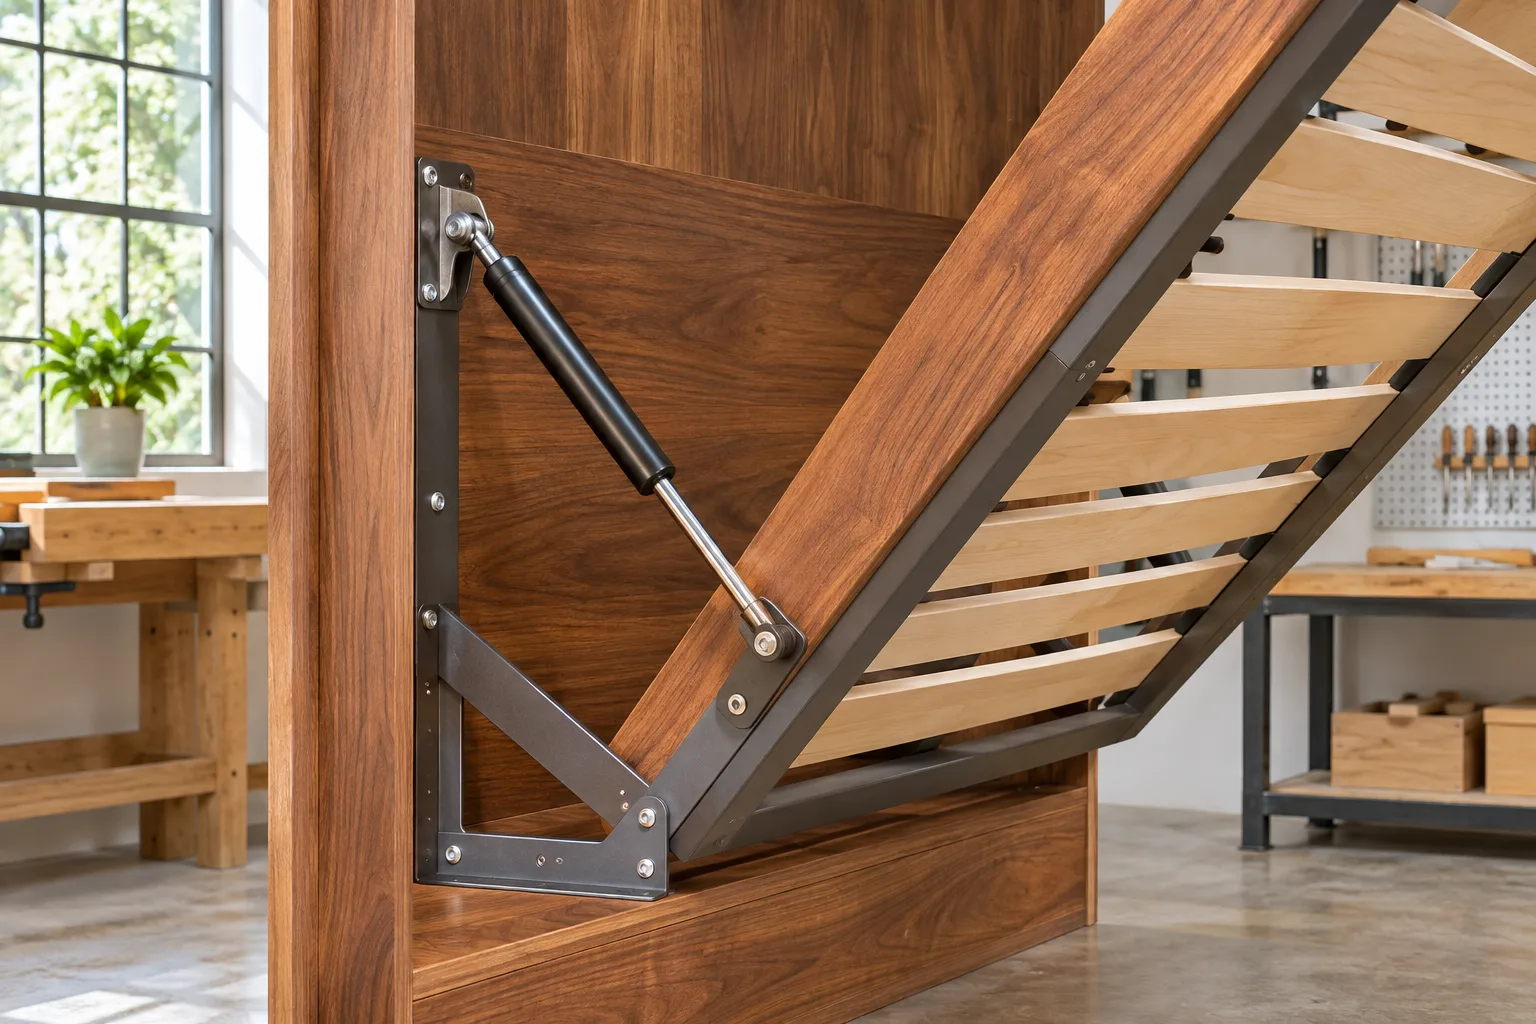
What the Murphy bed gas springs do—and what they don't
A gas piston, also called a gas spring, supplies assistance as a hinged panel moves. On a Murphy bed, correctly selected springs can reduce the effort needed to raise or lower the bed. They don’t make a heavy bed harmless, remove pinch hazards, or guarantee that the bed will remain safely supported in every position.
Justin explains that he could lift his bed himself, but others in his household were having trouble. The pistons made movement easier and, as he demonstrated, helped the bed hold its position. He nevertheless continued using the safety pins. That distinction matters: his report describes how his own bed behaved; it isn’t a universal safety design or a reason to omit the bed’s specified locks and supports.
Gas springs may also assist hinged panels on a caravan bed, trap door, or pickup truck hood. Each has different weight, pivot location, travel, and mounting constraints, so the spring and hardware need application-specific sizing. For gas piston installation, don’t choose a part simply because it resembles one used on another object. Confirm the dimensions and motion required for your panel before beginning gas piston installation, and retain appropriate mechanical safety provisions throughout gas piston installation.

Plan gas spring selection before building
Spring force and geometry depend on the application. Before choosing a gas spring, gather the panel’s dimensions and weight, locate its pivot, and define how far it must open. Also identify likely mounting positions on both the fixed frame and moving panel. Those details affect the opening and closing force, the spring’s angle through its travel, and whether it can fit without interfering with the structure.
Record the application dimensions and measuring points clearly. Check the proposed mounting position with the panel both closed and open, and verify the required gas spring length and stroke against the product specifications. Compare the specified force, often listed in Newtons, rather than guessing a Newton force from the spring’s appearance. A gas spring configurator or calculation tool can help with gas spring selection when available, but enter accurate measurements and confirm the result with the supplier.
Asked about his own parts, Justin recalled using a pair that he thought were about pounds each, but he wasn’t sure; he said their link was in the original video description. That estimate is not a recommendation for another bed. For gas piston installation, use the actual requirements and supplier specifications, not Justin’s uncertain figure. This application-specific sizing is worth doing before gas piston installation begins, especially if you’re still designing the bed.
A five-step gas spring installation process
Use this five-step installation process as a planning framework, not a replacement for the product’s installation guide. Bracket positions and spring geometry must suit your particular bed or panel. If the supplied instructions differ from general guidance, follow the product instructions and confirm uncertain measurements with the supplier.
- Measure the application. Record panel dimensions, weight, pivot location, desired travel, and potential clearances.
- Select the spring and mounting parts. Verify force, stroke, extended length, end fittings, and compatibility with the application.
- Establish mounting points. Check the geometry with the panel closed and open, and mark matching positions on both sides where the design calls for paired springs.
- Install and test the hardware. Securely support the panel, fit the hardware as instructed, and move the panel slowly through its travel.
- Inspect and adjust. Check for interference, binding, loose fasteners, and unexpected movement before regular use.
Justin’s retrofit shows why advance planning helps. He installed a lower plate, got inside the bed frame, raised the mattress-free bed past parallel, and attached the other end with some adjustment allowance. He later said he believed fitting the pistons before assembling the swivels would have been better. That’s his assessment of his project, not a universal order for every bed. Planned gas piston installation gives you more opportunity to check access and clearance; use the specific installation guide when carrying out gas spring installation.

Mark mounting points and avoid binding
Before drilling, make a simple diagram of the mechanism. Show the panel pivot, fixed and moving mounting brackets, ball studs or other end fittings, and the gas spring’s center-to-center distance at relevant positions. Include the closed and open positions so you can see whether the spring fits and changes angle as intended. A drawing won’t replace the product’s geometry requirements, but it can expose clearance problems before they become holes in the wrong place.
Measure from consistent reference points on each side. If the design uses two springs, mark the left and right mounting points symmetrically, then check the complete opening and closing arc. Confirm that the spring won’t rub against the frame, twist sideways, hit the mattress or nearby trim, or bind near the end of travel. Mounting brackets secure the spring to the structure; ball studs and other end fittings connect the spring ends to those brackets. Match these parts to the spring ends and the loads they must carry.
Justin’s headboard adjustment is a useful warning about clearance: he said he had to cut two inches off the headboard to make room for the pistons. That was a change to his own project, not a standard clearance measurement. During gas piston installation, check for obstructions early rather than relying on a late modification. Careful marking supports a more predictable gas spring installation and reduces the chance that the finished mechanism will rub or bind during gas piston installation.
Install and test the gas pistons safely
Support the bed or panel securely before removing, fitting, or disconnecting a gas piston. Don’t rely on the piston alone to hold a heavy bed or lid while you work. Keep the support stable, and ensure the moving panel cannot fall or shift unexpectedly. Gas springs are pressurized components: wear eye protection, keep them away from heat and puncture hazards, and follow the product instructions. Never cut, drill, or try to open a gas spring.
Some gas springs are installed with the rod down when the mechanism is closed, but that is only a starting point; orientation requirements can vary by product. Check the specific installation guide rather than assuming one orientation fits every spring. During the test, move the panel slowly, keep your hands clear of pinch points, and check that fasteners and end fittings remain secure. Test with the mattress or intended load considered, following the bed and spring instructions.
Justin installed his pistons with the mattress removed and cautioned that the bed felt heavy near the bottom. He advised maintaining a firm hold there. That detail reinforces why a controlled test and secure support matter even when springs assist movement. During gas piston installation, stop if the bed drops, binds, or behaves unexpectedly; secure it before inspecting the cause. Don’t treat a successful first movement as proof that gas spring installation is safe without checking the full travel. Keep the bed’s safety pins or other specified safeguards in use during gas piston installation and operation.
Replace or choose gas springs for other applications
When replacing an existing spring, record its part number before ordering, if it’s available. Compare the original spring’s stroke, extended length, force rating, end fittings, and orientation with the replacement specifications. Also confirm that the mounting points and application still match the original design. If the part number can’t be read, gather measurements and ask the supplier to verify a suitable match.
Matching only the appearance or approximate length can lead to the wrong opening and closing force, or a spring that won’t attach to the existing mounting points. A replacement may look similar while differing in stroke or force. Check the supplier’s specifications rather than making a choice from a photo alone. For a new caravan bed, trap door, or pickup truck hood, use the same measurement-first approach, but don’t transfer another application’s spring choice or mounting positions: each panel has its own dimensions, pivot, movement, and mounting constraints.
You may encounter a steel gas spring or a stainless steel gas spring as product options. Compare the material with the application’s environment and the supplier’s stated specifications; the video doesn’t identify Justin’s spring material. For replacement gas piston installation, verify every fit and force detail before ordering. This careful gas spring selection is more dependable than picking a spring that simply looks close, and it helps avoid repeating a mismatched gas piston installation.


Troubleshoot force, movement, and attachment problems
If the bed sags or is hard to open, first check whether the spring force and application dimensions were selected correctly. Then compare the actual brackets with the planned mounting points. A spring that’s incorrectly positioned can provide a different effect through the panel’s travel, even if the part itself is in working condition. Don’t try to solve a geometry problem by forcing the bed.
If closing is difficult, investigate excessive spring force, incorrect mounting geometry, interference, or rubbing between the panel and frame. If the gas piston rubs or binds, stop and inspect the full movement path, pivot alignment, left-to-right bracket symmetry, and center-to-center measurements with the panel in relevant positions. Make corrections only after securely supporting the panel and checking the manufacturer’s instructions.
If an end fitting won’t stay attached, stop using the bed or panel and support it securely. Inspect the fitting, ball stud, and mounting hardware for damage or incompatibility; don’t keep testing a connection that may separate under load. Justin said his pistons helped, but he wished he had planned for them earlier and wasn’t sure his retrofit was the correct method. That’s a reason to treat gas piston installation as a measured design task, not an improvised fix. Recheck the spring and brackets before resuming gas spring installation or use, and don’t continue with gas piston installation until the problem is resolved.
Source video and project context
Watch Justin Built’s original “How to install Gas Pistons (Murphy Bed Q&A)” video. It’s a follow-up to his Murphy bed build, which he says was inspired by Glen from DIY Creators. Justin uses the follow-up to answer viewer questions about the pistons, materials, dimensions, and choices involved in his build.
The video description identifies Glen from DIY Creators as an inspiration, while Justin says the links for the pistons are in the original video description. No product URL or specific manufacturer’s installation guide is provided here, so check the original description and the instructions supplied with the product you choose. The video is most useful for seeing Justin’s particular retrofit and hearing what he would have planned differently; treat it as project context, not a substitute for product-specific instructions.
There are no reliable timestamps in the supplied transcript, so this article doesn’t assign time markers to individual comments. Use the video as an installation video reference for Justin’s demonstration, then use the applicable product guide for measurements, orientation, and hardware requirements. That distinction keeps gas piston installation grounded in the creator’s experience while leaving application-specific decisions to verified specifications. Keep the source video handy when comparing your own gas spring installation plan with the retrofit, but don’t copy its mounting positions without checking your bed.

Conclusion: plan the bed, verify the spring, and test carefully
Justin’s Murphy bed shows how gas springs can make a heavy bed easier to move, while also showing the limits of a retrofit. The pistons helped his bed stay in position, but he continued using safety pins, described the lower part of the bed as heavy, and wished he had planned the pistons earlier. Those details are the most practical takeaways from his experience.
Before starting your own project, take these steps:
- Measure the panel, pivot, travel, and intended mounting locations.
- Confirm spring force, stroke, length, fittings, and orientation with the supplier’s specifications.
- Check bracket clearance and symmetry through the full movement arc.
- Support the panel securely, follow the installation guide, and test slowly with hands clear.
- Keep specified safety pins or other mechanical supports in use, and stop if the assembly rubs, binds, sags, or disconnects.
Good gas piston installation is less about copying a particular build and more about matching the spring and mounting geometry to your bed. Plan first, verify the hardware, and use the original video as an account of one builder’s experience—not as a universal design prescription.
Key Takeaways
- Plan gas springs into a Murphy bed’s design instead of treating them as an afterthought.
- Choose spring force, length, stroke, and mounting geometry for the specific application; don’t copy Justin’s uncertain force estimate.
- Support the bed securely during work and testing, keep hands clear, and follow the product instructions.
- Check clearances and movement through the full arc, and stop if the spring binds, rubs, or detaches.
- Gas springs assist movement but don’t replace specified safety pins or other mechanical supports.
Frequently Asked Questions
Should gas springs be installed before assembling a Murphy bed?
Plan for the springs early and follow the bed’s assembly instructions. Justin said he believed installing his pistons before assembling the swivels would have been better, based on his retrofit experience.
Can you use a Murphy bed without gas pistons?
Justin said he could lift his bed without pistons, but it was heavy and harder for other household members to manage. Whether another bed can be operated without assistance depends on its design and instructions.
What force gas piston did Justin use?
He recalled approximately pounds per piston but was unsure. Treat that as an uncertain recollection, not a recommendation; size your own application using accurate measurements and supplier specifications.
Do gas pistons replace safety pins?
Justin said the pistons held his bed in position, but he still used the pins for safety. Follow the bed hardware instructions and retain its specified safety provisions.
How much did the pistons and project cost?
Justin recalled about $25 for both pistons and estimated the total project cost at around $300. These are his recollections, not current prices or a quote for another project.